
 One of the important issues in winter camping is procuring water. Typically that means melting snow. This requires a lot of fuel and a stove/fuel combination that works well in cold weather. For may years, conventional wisdom recommended pumped white gas stoves. More recently, pressure regulated, iso-butane canister stoves have gotten the nod as long as it isn’t really! cold. The venerable classic Mountaineering – The Freedom of the Hills, now in its 9th edition, states that alcohol as a fuel is best for “Ultralight cooking on long trips where melting snow or ice is not required.” Five years ago, I posted about winter/snow camping. Most of the post focused on the challenges of adding a 4th season to your outdoor trips, but also I used an alcohol stove for melting snow. It worked and since then I have built more stove/windscreen combinations and wondered if the changes I was making might also improve snow melting. So on a recent nice February day I went snowshoeing to find out.
If  you are going to do field work, you might as well pick a prime location. The mountain was out with a nice standing wave cloud trailing down its back side. I found a good spot in the sun with a handy supply of clean snow and unpacked my kitchen.
I have been a fan of cone windscreen/pot supports for a long time. While I first became aware of them as Trail Design’s Caldera Cone product line, this stove style actually has a long history (See Zen Stoves). You can even find a lot of cone windscreen videos on YouTube. I started with a titanium Caldera Cone system that fit my titanium Snow Peak Multi-Compact pot set. However the cone height prevented it from storing inside a pot. This lead me to other solutions, covered in past blogs, including making a cylindrical windscreen with titanium tent stake pot supports that mates with a taller mug style pot. I also played with constructing split cone style windscreens, sized so that the two sections would nest inside my smaller Snow Peak 770 ml. pot. This pot is shorter and wider than mug profile pots, thus is more fuel efficient and easier to cook in. I used these windscreens with alcohol, Esbit tablets and even with my remote canister Kovea Spider stove.
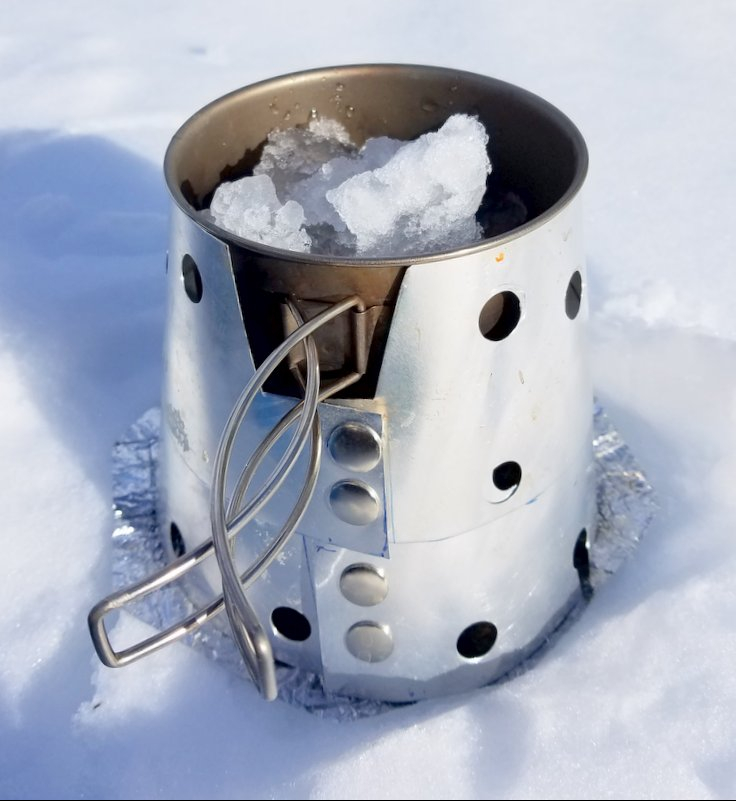
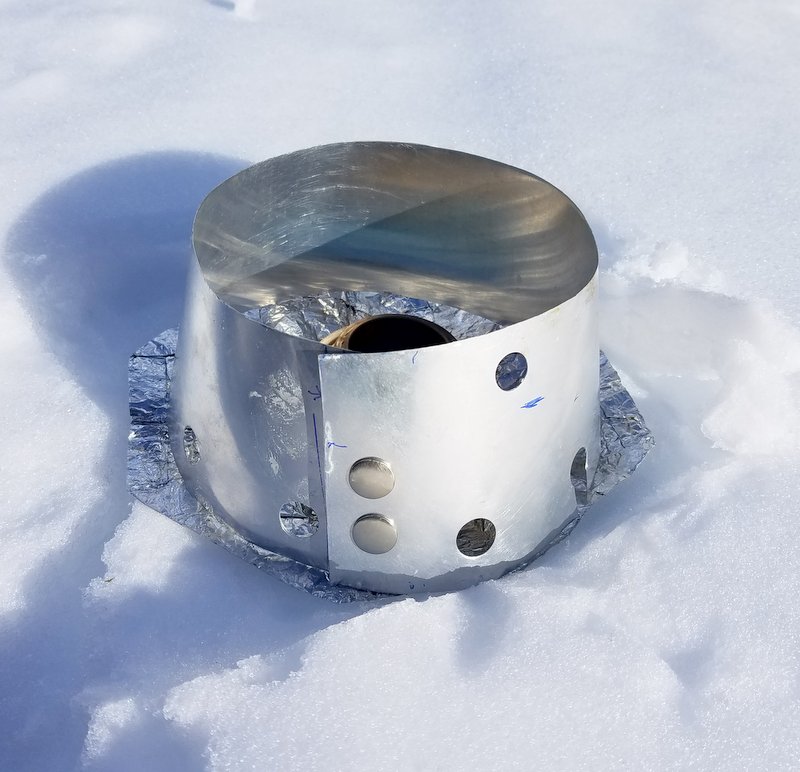
Eventually I built the windscreen featured in this post. It is sheet aluminum, using a clothes dryer duct section as stock, sized to be larger and with more separation between the stove and the pot. The base diameter is 6-3/4″. The rim measures 5-7/8″ in height. My pot is 2-1/2″ from bottom to the rim, putting the bottom 3-3/8″ above the base.
I like to use clothing snaps to close the windscreen. I am indebted to Jon Fong of Flat Cat Gear for this trick. Here I picked heavy duty snaps, such as you might use on jeans. The other design details include placing air intake holes only on the back side of the lower screen (away from the wind direction). The holes at the top of the upper screen have twice the total area of the lower holes since burning hydrocarbons produces roughly twice the volume of exhaust gas as the amount of intake air required for combustion. With an aluminum foil floor, the reflective, wind sheltered space inside the screen insulates the burner and combustion process from the outside environment and provides consistent performance even in the cold.
The wider, taller screen addresses several issues. The added volume of the combustion space and increased distance from the burner to the pot permits more complete combustion of whatever I am burning. The amount of Esbit soot I need to clean from the bottom of my pots when using tablets decreases. I hoped that this would also eliminate another problem when melting snow with alcohol. The cold pot bottom seemed to be quenching the alcohol flame and/or reducing the thermal feedback, significantly reducing the stove output.
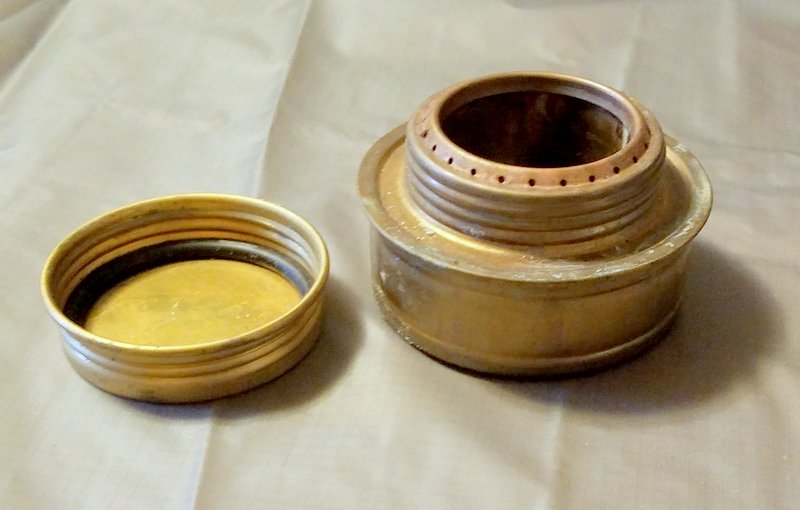 For this test I used my very traditional Trangia Spirit Burner. Most alcohol stoves are designed to be single shot – add 3/4 to 1 oz. of alcohol and fire until the alcohol runs out – 6 to 8 minutes typically. Melting snow this way is a pain, constantly requiring you to stop, refill and relight the stove. The Trangia burner will hold 4 oz. of alcohol which melts quite a lot of snow in one burn. The burner measures 1-1/2″ in height, slightly taller than my other alcohol stove. This still provides a 1-3/8″ separation from the pot bottom. The rugged, high capacity burner with its tightly sealing lid weighs in at slightly over 3 oz. Of course if I’m not melting snow, I am using my 1/2 oz. Trail Designs 12-10 stove.
 I prepped my site by packing a level snow surface and unfolding the aluminum foil ground sheet that both protects the ground and keeps heat inside the screen. I use a small disk of blue foam pad to insulate the burner from the snow. You should really put the foam below the foil to protect it from the stove heat. I melted mine a little this time. Next comes the lower section of the screen and the burner, followed by the upper section. It is easy to lift off the upper section to light the stove. Lighting only the alcohol in the center pot seems to be sufficient to generate enough heat to let the stove “bloom”, igniting the jets around the rim. Then the upper section is replaced and the pot added.

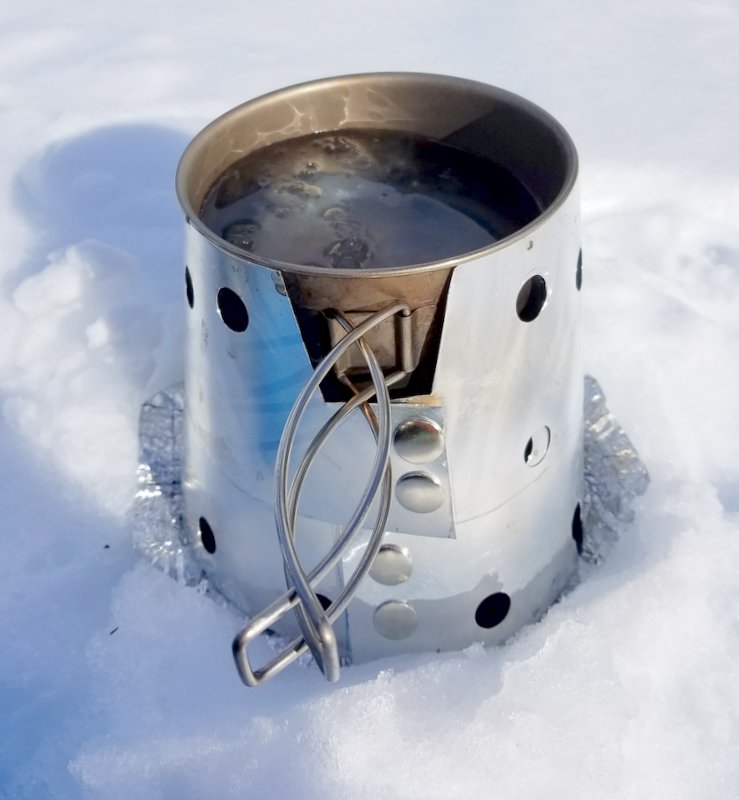 With aluminum pots, you should first add some water to keep the pot bottom from overheating before the snow starts to fully melt. Titanium doesn’t care, but I will add snow slowly by hand until I get a good water depth. Then just keep adding more snow as the melt continues. I stir the snow to melt the last lumps before pouring a full pot into a water container, in this case a 1 liter Nalgene bottle marked with oz. to more accurately measure my results. I got about 28 minutes of burn time for my 4 oz. alcohol fill and produced 72 oz. of water melted from snow. That’s 18 oz. of water melted per oz. of alcohol burned, not a bad ratio considering the pack weight of the stove, windscreen and fuel: 16.6 oz. including 12 fl.oz. of alcohol in an empty 16 oz. plastic Coke bottle. Compare that with my other cold weather system, the Kovea Spider
  stove running on an inverted iso-butane canister, using the same windscreen.That setup weighs in with a full canister at 16.3 oz. But the alcohol/Trangia combination all packs inside my pot, inside my insulated cozie. Everything is really rugged with no moving parts. Unlike alcohol systems, you must pack out the weight of a canister and recycle the empty. Although the amounts involved are tiny, alcohol is also a sustainable bio-fuel for a few more green points.
After I finished with my snow melt test, I put another oz. of alcohol in the burner, made a comfort light hot lunch, Annie’s microwave white cheddar mac and cheese with some maple flavored bacon jerky tossed in for flavor and watched the mountain. Life is good.

Thanks, Henry. Thus is a great post. I generally use my alcohol stove, but without your customizations. I was interested by your comment about aluminum overheating but that titanium doesn’t care. Do you know how stainless would respond? My sense is that it would care, though perhaps not like aluminum.
You are correct Mike. The peak flame temperature of burning alcohol is about 1900 deg. F. Aluminum melts at about 1200 deg. F. and will lose straighten when heated to above 400 deg. F. Stainless steel is recommended to be used below about 1500 deg. F. but will be glowing red by this point. Titanium simply gets a coat of oxide that will range in color from yellow to blue to gray in these temperature ranges. Bottom line – don’t let aluminum pots run dry, and don’t let stainless steel pots sit dry for a long time over flame.
Great post Henry. How did you make the ventilation holes? With a drill or with a punch?
I use a wood auger bit. They have a center lead screw and cutting edges at the end of the end of the auger. Place the center screw where you want the hole and lightly turn the bit to score the thin aluminum sheet with the cutting edges until the hole comes free.
Thank you for sharing the detailed information. I’ve been getting ready for my first winter trips and have been thinking about using alcohol stove for melting snow. It doesnt seem to be common
The two big things to solve is how to provide a good windscreen and base so that the stove stays warm and evaporates alcohol fast enough to give you decent heat output and having a large enough alcohol reservoir in the stove so that you don’t have to keep refilling it. The Trangia burner was the key for me.
Pingback: A hot lunch on a cold day with Esbit fuel. | Henry in the Woods
what does the pot itself rest on? Is the lower part of your windscreen smaller to provide a base for your pot?
The upper section of the windscreen is sized so that the pot rim just hangs on the top of the screen. That makes it really easy to lift out and put back on. This is a common design in cone-style wind screens.