
 YouTube videos for tarp tents often show a 3 meter x 3 meter tarp being pitched a number of different ways. One makes a single pole, hexagonal tent with a large interior and overhanging entry, It is described as a great emergency shelter, roomy and quickly pitched. I wondered if it could be made as a stand-alone lightweight backpacking tent.
I experimented with a cheap 10′ x 10′ blue plastic tarp to visualize the design and interior space. Using some of the new, reasonably priced, lightweight coated polyester fabrics now on the market, how light could it be? Well, it’s finished and what’s not to like about a final overall weight of just 1 lb. 14 oz., including a 42 sq.ft. floor, 49″ center pole, stakes, bug netting door, and stuff sack.
I started with 7 yds. of silicone impregnated, 0.93 oz./sq.yd., Membrane Silpoly fabric from Ripstop by the Roll. With a usable fabric width of about 58″, two pieces joined with a center seam, make a hemmed tarp, 9′ 4″ square. Not quite 10′ x 10′, or 3 m x 3 m either, but big enough. I added 16 edge loops for staking and 3 reinforced pull out loops along the seam, at the center and quarter points, to take the interior pole and additional guy lines. The center seam and tabs were sealed with mineral oil diluted silicone caulk. I set it up  with a trekking pole, spread out some polycro for a ground cloth and let it get rained on. There was one minor leak on a center pull out, but I liked the way it shed rain. The finished tarp alone weighs only 13.3 oz. A good start.
The tarp pitches with a minimum of 7 stakes (2 oz. in Ti). Add a 5′ x 7′ polycro ground cloth (3 oz.) and your trekking pole, and you have a pretty lightweight shelter, at about 1 lb. 3 oz. But still with no bug protection, a pretty light duty ground cloth and marginal staking, with Ti shepherd crook stakes. If there is a philosophy to this blog site, it is how much nicer can it be for just a little more weight.
 So here’s what the additional 11 oz. got me. I added a fitted, hexagonal tent floor of 1443R Tyvek, available from kite making suppliers. This is the same Tyvek I have used as a floor of my Night Wing tent for a lot of seasons. I like the way it holds up and performs. Just like with the Night Wing, I use thin bungee cord loops stretched between the floor corners and the tarp stakes to keep the floor flat and in place. I found a 1.8 oz., 49″ sectional carbon fiber pole (Six Moons Designs) that, for minimal additional weight, frees my trekking poles from tent duty. To protect the tarp fabric, the pole is capped with a wine cork, drilled to take the pole tip. I added a triangular mesh door with a center zipper that hangs from the cork pole tip. The net is held tight to the tarp walls by bungees
  running from the center pole cap to two of the outside tarp stakes. Stakes on all the remaining tarp loops stretch the fabric taut and hold it close to the ground to complete the insect barrier. In addition to the front beak guy line, I add a line at the rear to pull the rear tarp panel out a bit for better interior volume. That totals 13 stakes. Good “Y” section aluminum stakes, at .32 oz. each give me holding power with modest weight. With the pole offset toward the entrance, in front of the Tyvek floor area, I have 49″ of siting headroom in the tent center, plus a covered vestibule entry beyond the mesh door.
Here’s a quick guide to pitching the tent:
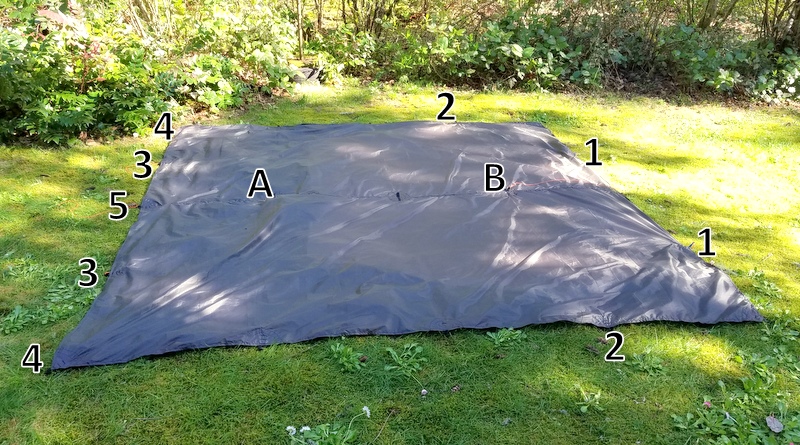 Start with your tarp laid flat on the ground. Identify the stake loops around the edge and guy points in the photo. Loops 3-5 are at the front and loops 1 are in the rear. Left and right are symmetrical.
- Start by staking out loops 1 with the tarp taught. Place two stakes at the loop points 3 as markers, but don’t stake down the tent here.
- At loops 2, pull the tarp taught from stakes 1. Holding the tension move the loop in towards the center of the tent about 2″ and stake. This distance gives the tarp a little slack to allow the rear wall to be pulled out. Fold the outside corner triangle under to the inside of the tent, out of the way.
- Now go to loops 4. Pulling tension from stake 2, move the loop in towards your marker
 stakes at point 3. Because loop 4 swings on a radius from stake 2, this point will be a little inside the temporary stake 3 point. Stake loops 4 here. The distance between the resulting loop 4 positions sets the center pole height. Loops 4 are closer together for a longer pole and farther apart for a shorter pole. For my 49″ pole, I space the loops about 40″ apart.
 - Now insert your pole so that the top end rests on the tarp pullout A. Use the handle of the
 trekking pole or pad the top of fixed pole (I used a cork) to protect the tarp fabric. If you are using an adjustable trekking pole, set the pole length to pull the tarp taut. If you have a fixed pole, you may have to move stake points 4 a bit to make everything tight. Adjust everything so that the pole is vertical and the tent sides taught.
 - Now take the tarp loops 3. Run a guy line from these loops back to the stakes at loops 2. When you tighten these lines, the tarp will pull back to either side of the door in wings.
- Run a guy line from loop 5 out to a stake in front of the tent to tighten the entrance beak.
- Running a guy line from pullout B to a stake behind the tent will add some volume to the
 inside of the tent.
 - Go around and adjust the stakes as necessary to get a tight pitch. I stake down the remaining loops to get good fabric tension, but you may not need that.

Any square tarp can be pitched this way as long as it has the right stake loops. The pullouts along the ridge are not as necessary, but you need to be careful at the spot where the tarp fabric rests on the pole end. The handle of a trekking pole makes a good tarp support. The shelter volume will vary with the tarp size, but even smaller tarps will make a decent emergency shelter.

Pingback: Gear Trials – A Comfort light trip in Mt. Rainier NP | Henry in the Woods
I set this up today in my backyard and it is amazing what a rectangular piece of silnylon can become. I used my Exped Tarp ii and followed the instructions as posted. The Hexlite turned into a spacious home for backpacking. It looked like it would shed the wind very well and was quite stable. I first set it up using a 42inch trekking pole and then lengthened it to 47 inches and it seemed to create quite a bit more room. Of course I had to adjust some stakes and re-tension a couple of tie outs. Thanks for posting this Henry.
Henry, Do you sleep in a bivvy bag with bathtub or count on the tyvek to keep the puddles at bay?
Tbh i don’t understand what’s meant by a “standalone tent” here. You are doing exactly what these youtube videos demonstrate. They are as much standalone as yours? 🙂
I was interested in adding features to the tarp so that it would serve as a more complete tent with a floor and bug protection without adding too much weight. In this case “standalone” implies a complete tent vs. just a tarp shelter.