
 During a break in our seemly endless series of Pacific Northwest winter rains/snows, I took a day snowshoe hike on a familiar ridge in Mt. Rainier National Park. It seem like a good day for a stove experiment. Normally on winter outings, I take along a 20 oz. capacity stainless steel thermos, fitted with a reflective foil insulating wrap. At lunch, even in winter, it provides steaming hot water for instant espresso spiked hot chocolate drinks. On this trip, I opted to leave the thermos behind and take my small solo stove setup based on a Toaks 750 ml. titanium pot and windscreen to provide the heat. That meant I could forgo the normal cold sandwich and have my favorite trail hot meal – Annie’s Microwave
  White Cheddar Mac & Cheese with some maple flavored bacon jerky bits thrown in for good measure, plus the normal mocha hot drink. My little stove setup is designed to be fired either with alcohol or Esbit tablets, which were the choice for this trip. Continue reading
Melting Snow with an Alcohol Stove
 One of the important issues in winter camping is procuring water. Typically that means melting snow. This requires a lot of fuel and a stove/fuel combination that works well in cold weather. For may years, conventional wisdom recommended pumped white gas stoves. More recently, pressure regulated, iso-butane canister stoves have gotten the nod as long as it isn’t really! cold. The venerable classic Mountaineering – The Freedom of the Hills, now in its 9th edition, states that alcohol as a fuel is best for “Ultralight cooking on long trips where melting snow or ice is not required.” Five years ago, I posted about winter/snow camping. Most of the post focused on the challenges of adding a 4th season to your outdoor trips, but also I used an alcohol stove for melting snow. It worked and since then I have built more stove/windscreen combinations and wondered if the changes I was making might also improve snow melting. So on a recent nice February day I went snowshoeing to find out. Continue reading
Where to get DIY ultralight backpacking gear materials
 So you’ve decided to enter the wonderful world of DIY (do it yourself) / MYOG (make your own gear) because the result will be lighter, cheaper, better, just what you want, or all of the above. But a lot of the materials for these projects don’t show up in your local stores. This post shares my favorite suppliers for a wide range of projects I have completed.
Fabric
Certainly one of the revolutions in ultralight gear is the availability of new fabrics. Dynema Composite Fiber (DCF) may be the hottest, newest, lightest thing on the block, but it is also quite pricey. I am very happy with the new silicone impregnated polyesters. Ripstop By The Roll has become my go-to source for fabric, with a great selection, good prices and  fast service. I currently use their Membrane Silpoly, weighing 0.93 oz./sq.yd., for waterproof applications. For breathable fabric with a durable water repellent finish, Membrane 15 poly taffeta, 0.9 oz./sq.yd. works well. The standard 1.3 oz./sq.yd. silicone coated nylon ripstop is still a good choice for a waterproof and slightly tougher fabric. Plan to buy a little more than you need to cover mistakes and build your collection of small pieces that are great for stuff sacks, etc. If you don’t want to start from scratch, check out their selection of kits or project plans. Ripstop By The Roll also carries batting insulation, and a selection of bug netting and other components such as webbing, buckles, zippers, velcro and thread. Continue reading
What’s the best backpacking gear for you?
 Whether you are just getting into backpacking, or looking to improve your experience, choosing from the ever increasing universe of gear options can be daunting. It’s all compromises, as any experienced packer knows. I was reminded recently of the well known thru-hiker wisdom – “Hike your own hike.” The same applies to gear selection – “Pick your own stuff.” In fact someone’s gear list is probably a good clue to their backpacking personality. No gear will hit the sweet spot for all aspects, but some might come close. Continue reading
Gear Trials – A Comfort light trip in Mt. Rainier NP

Rain on the new tent
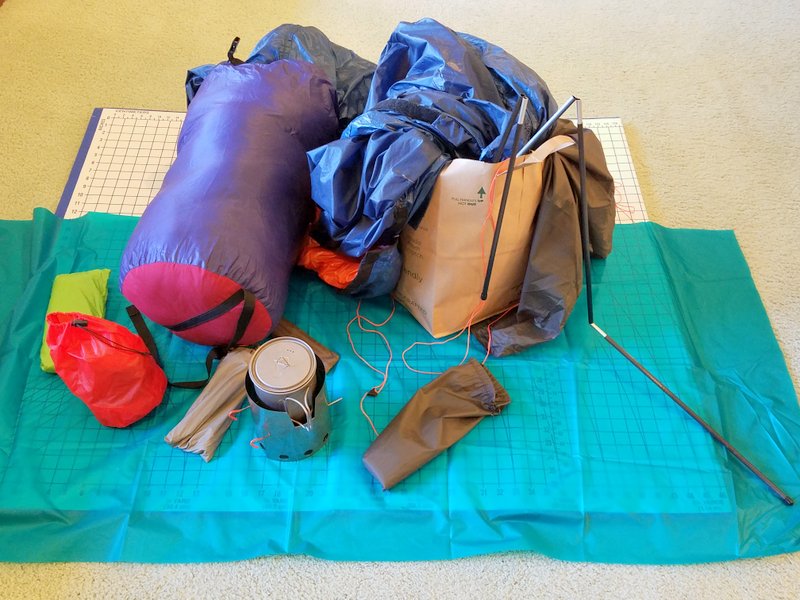
After a new ship is launched, it gets to meet the ocean for the first time with “sea trials”. As our parks reopen and snow leaves the high country, it was time to get out for gear trials with recent projects. I headed for a Park camp adjoining a couple of sub-alpine lakes at about 4700′. The forecast was for a nice day, followed by a weak front overnight with a chance of rain in the morning. As the first backpack of the season, I wanted to reality test my current set-up. I had finished a new tent – the Hex-Lite. My ultra-light bivy would serve as a quilt and air pad cover. I was planning to Esbit cook with a single pot. It was time to test a new Therm-a-Rest NeoAire Xlite air pad. My Big Agnes pad no longer held air overnight and was 6 years old. New gear keeps betting better. The Therm-a-Rest, with pump sack weighs only 15 oz., a 5 oz.  improvement.
My claim for Comfort light backpacking is a 15 lb. base weight. For this trip, my actual was 16 lbs. – close enough. With overnight food and water, I left the car at 21 lbs. (I don’t really count fuel separately anymore, since for this trip it was 3 Esbit tabs – 1.5 oz.) Everything packed easily into my 2800 cu. in (46 L) RayWay pack, with the extension collar almost completely rolled down on top. Now over 7 years old, it is still a very comfortable pack to carry. Continue reading
HexLite – Making a spacious, full featured, sub 2 lb. tarp tent.
 YouTube videos for tarp tents often show a 3 meter x 3 meter tarp being pitched a number of different ways. One makes a single pole, hexagonal tent with a large interior and overhanging entry, It is described as a great emergency shelter, roomy and quickly pitched. I wondered if it could be made as a stand-alone lightweight backpacking tent.
I experimented with a cheap 10′ x 10′ blue plastic tarp to visualize the design and interior space. Using some of the new, reasonably priced, lightweight coated polyester fabrics now on the market, how light could it be? Well, it’s finished and what’s not to like about a final overall weight of just 1 lb. 14 oz., including a 42 sq.ft. floor, 49″ center pole, stakes, bug netting door, and stuff sack.
I started with 7 yds. of silicone impregnated, 0.93 oz./sq.yd., Membrane Silpoly fabric from Ripstop by the Roll. Continue reading
A DIY, ultralight, multipurpose bivy sack
 In the past, on some multi-day climbs, I slept under a tarp, with my quilt and air mattress inside a bivy sack. I also had other nights in a tent, in alpine country, with condensation wetting out my exposed quilt. Sometimes in shoulder seasons, my quilt isn’t quite warm enough. Then this year I discovered a great source of ultralight fabric. These were all motivations to try another project – an ultralight bivy, with options for bug protection and a cold weather liner. I finished it and have now tried it out successfully on a cold night.
The fabric source is Ripstop by the Roll. They offer a wide assortment of coated and uncoated nylon and polyester at weights as low as 0.56 oz. per square yard. Continue reading
Making an ultralight titanium multi-fuel windscreen
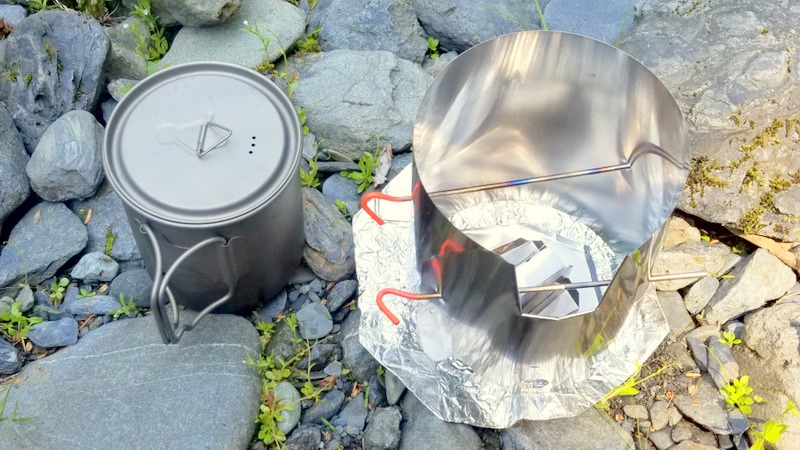 I continue to be a big fan of titanium for ultralight applications. A cylindrical titanium windscreen might make a ultralight, minimalist cooking kit. This one was easy to build, weighs just 52 g. with two titanium stakes that serve as pot support and pin the windscreen closed. It is sized to work with a Toaks 750 ml. titanium pot and either an Esbit tablet or alcohol burner. On the trail, it seems a rugged and solid performer
I started with some titanium sheet from Ruta Locura. The windscreen has 5/8″ holes around the base on the handle cutout side. When the windscreen is rolled and pinned, 3 of the 8 holes overlap to give adequate combustion air inlet. Stake height is set at 3″ to place the pot high enough above  the tablet for good combustion. Overall, the windscreen is 6″ tall by 24″ long, with a 5″ diameter as assembled. In use, place the handle cutout and combustion holes away from any wind.
A bottom sheet of folded kitchen aluminum foil completes the combustion space. The Esbit tablet sits in a Trail Designs Gram Cracker holder. Under the holder is a little Ti pan, folded out of Ti scrap from the windscreen stock to contain any Esbit flare ups. Continue reading
Backcountry Electronics Revisited – 5 years later
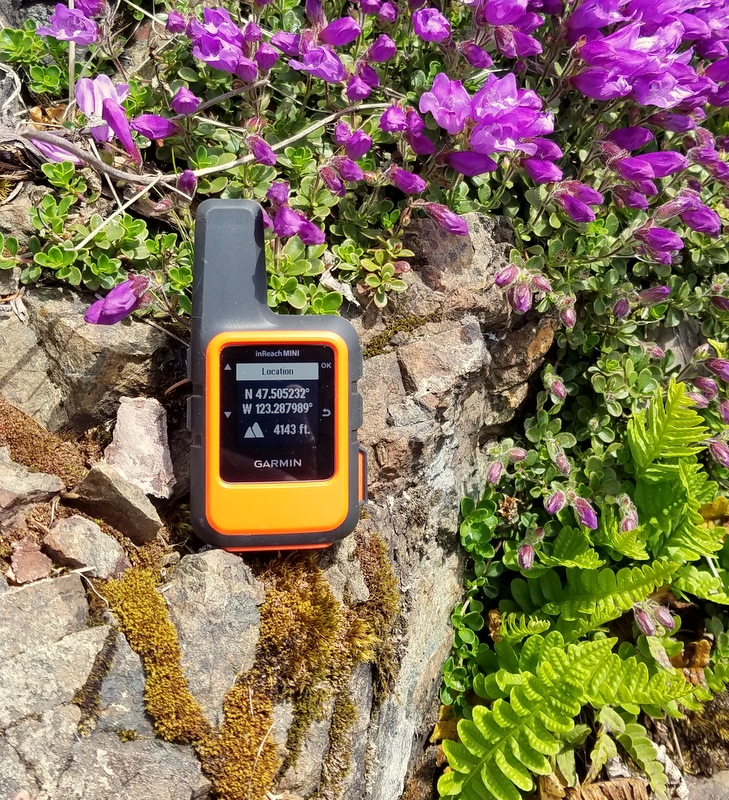 Guess what, 5 years later I am on another generation of backcountry tech devices. Back then, I was carrying a Spot Connect satellite communicator, a Samsung Galaxy III smart phone and a Garmin Oregon 400 handheld GPS. I still carry the same 3 functions, but now it’s a new Garmin InReach Mini, a Galaxy 7, and an Oregon 600. And, no surprise, they are better. The GPS and smartphone were replaced as they died or aged. The new Garmin satellite communicator just out performed the competition.
Garmin InReach Mini
The InReach Mini gives me two way SMS communication, which is the new standard for backcountry satellite devices. Emergency notification with location (“calling in the cavalry”) was the first popular backcountry satellite application and still remains an important, if hopefully infrequently used, function. Now having been on the receiving end of one of these contacts, I can say that it is useful, but still leaves lots of room for confusion. Being able to confirm and detail the nature of the emergency and have two way communication with responders makes life better and safer for all concerned. Expanding that two way capability to ordinary messaging offers a new level of utility. Both current SPOT and Garmin InReach devices do this. For higher annual subscription costs, you can also add connection to social media and location tracking. But I am quite happy with a basic level plan. Compared to the SPOT X communicator, the InReach Mini is a hands down winner and when my annual SPOT contract was up, I switched. Continue reading
A nesting backpacking kitchen
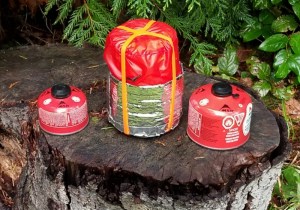 I have a friend whose backpacking kitchen is only a single small Titanium mug and a folding Esbit stove. He pretty much always cooks the same one pot meal. By the end of a trip he is pretty tired of it, but his set weighs little and he doesn’t spend a lot of time cooking. Sometimes this is a good answer, and sometimes you want more. As I have accumulated kitchen stuff, the goal of having it all (or most of it) in a light weight, compact package has been an itch. This post presents the current state of that quest.
So here is my 16 piece compact, complete kitchen, all packed up sitting beside two gas canisters for scale. It is versatile, light, compact, complete, and rugged. With it I can boil, simmer, bake, mix, hydrate, cozy, measure, prepare multi course meals, serve and clean up. All together, without fuel, it weighs 22 oz., and is about the volume of two 8 oz. fuel canisters. But of course you only need to bring the parts you are planning to use with that trip’s menu. Further, by swapping out the stove and windscreen combination, it has multi-fuel capability. So what’s in it? Continue reading
